| Are you sending us images we can use? |
|
 |
  |
 |
|
|
|
|
|
|
| The size at which we can use an image depends on what it is intended for - screen visual or print. We can often tell suitability from file size but this only works with tif, bmp and eps files. Jpg, gif and png are all file types that have been compressed down (and the amount of compression can be varied according to the program default or the user), so the filesize is no clear indication of what the expanded size will be. |
 |
|
|
|
|
|
|
|
| How do I know if a picture is good enough to print at the size I want? |
 |
|
|
|
|
|
|
|
|
The number of pixels in an image determines the size it can be used for various uses.
Screen use does not demand a great number of pixels (standard computer screens are often set to 800 x 600 pixels or more commonly now 1024 x 768 pixels for the whole screen area).
Commercial print, however, requires images to have a lot of pixels if they are to be printed at any decent size (e.g. 1748 x 2480 pixels for full A5, 2480 x 3508 pixels for full A4). If an image is too small for the intended size and just scaled up in the design software, the printed result will be 'pixelated' with the pixel blocks showing and with jaggy edges to elements in the image.
Home desktop inkjet printing can be successful at about 1/4 of the pixels required for commercial litho printing.
|
 |
|
|
|
|
|
|
|
| How can I tell number of pixels in an image file? |
 |
|
|
|
|
|
|
|
|
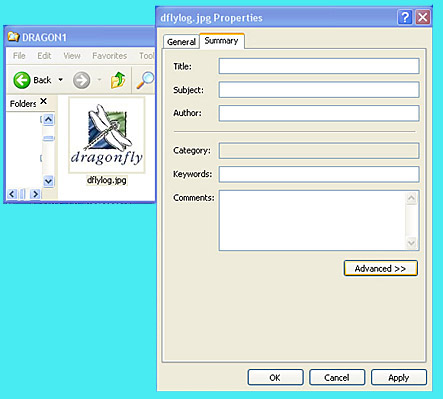
If you are used to editing images you will have a program like Photoshop which will tell you all the details in the 'Image Size' menu option, but if you are only have MS Office programs and the like on a PC, you can find out the details in the following way (this method is based on Windows XP: for Vista & Windows 7, look at the Details tab under Properties).
1. Right click on the image file wherever you have stored it and select Properties.
2. In the Properties dialogue box, left click on the Summary tab.
|
3. In the Summary box, left click on the Advanced button.
 |
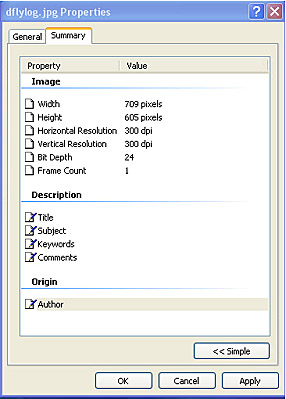
This then appears.

|
 |
|
|
|
|
|
|
|
| You can now see the number of pixels (ignore the resolution for the moment). NB if you right click on a picture on a website and go to Properties, you will also find the pixel dimensions. Note also that this operation works with tif, bmp, jpg, png and bmp files, but not with eps files. |
 |
|
|
|
|
|
|
|
|
The size we can print successfully is a correlation between the number of pixels and method of printing. What determines the final possible output size is the dpi (dots per inch) required by the print method. You don't need to know how this works, just to be able to enter the correct output dpi in the calculator below.
|
 |
|
|
|
|
|
|
|
| Calculator |
|
|
|
 |
|
|
|
|
|
|
|
| Having read the pixel size as outlined above, use the calculator below to find out the size at the dpi output required. Commercial print requires 300 dpi, our large format printing requires at least 75dpi and home desktop printing requires at least 72dpi. In general images can be enlarged by up to a maximum of 20% from this result, but after that the quality deteriorates visibly. |
 |
|
|
|
|
|
|
|
|
|
|
For commercial litho print (leaflets brochures etc), enter output dpi as 300.
For large format exhibition prints, enter 75 in the dpi output box to find out the largest the image can be on an exhibition print.
For home desktop printing, enter 72. |
|
|
 |
|
|
|
|
|
|
|
| We do have special software for enlarging images better than in Photoshop, but this software also has to add pixels where none were before, based on adjacent pixels, so the results are always less sharp than the original. It works best with images that are large in the first place (e.g. we need to enlarge for exhibition purposes); there's nothing that can be done with very small images. |
 |
|
|
|
|
|
|
|
| If on the other hand you need to tell a supplier how big an image needs to be to meet the output process for which you intend to use it, use our pixel size calculator by clicking on the button on the right. |
|
 |
 |
|
|
|
|
|
|
|
 |
|
|
|
|
|
|
|